Showing posts with label Daily Notes. Show all posts

Thursday, August 2, 2012

Friday 8/3/12: Retouching

"There are 3 key things for good photography: the camera, lighting and... Photoshop." - Tyra Banks

"Retouching had become controversial ever since Franz Hanfstaengl of Munich showed at the 1855 Exposition Universelle in Paris a retouched negative with a print made from it before and after retouching. It was, Nadar recollected, the beginning of a new era in photography." - Beaumont Newhall, History of Photography by Newhall, Beaumont Newhall

"Photoshop is useful in many ways but must NEVER be used for the altering of photographs. My assistants and my agency do whatever Photoshop work for me that may be required as it is too complicated for my brain. - Elliott Erwitt - On the question; Do you use Photoshop in your workflow? "


© Saddington Baynes / Retouching: Peter Aylward

© Chris Crisman

© Maggie Taylor

© Maggie Taylor

© Maggie Taylor

© Maggie Taylor

Retouching Tools
  • Burn and Dodge = To selectively lighten and darken areas of an image
  • Clone Stamp = Copies pixels from a target source area (via option-clicking) and pastes them in a new location
  • Healing Brush = Same as Clone Stamp, but it also blends with the existing pixels
  • Spot Healing Brush = Same as Healing Brush, but you do not have to target a source area which makes it great for spots.
  • Patch Tool = Combines the Healing Brush with the characteristics of the Lasso Tool so that you are not constrained by a circular brush area.  *Must be performed directly on an image layer - can not use the trick of retouching onto a new blank layer.
  • *Use Edit>Fade command to reduce the opacity of your last retouching tool stroke!  Or simply use the Eraser tool at any opacity (set in Options Bar) to reduce the retouching... as long as you placed your retouching strokes on a new blank layer!
Retouching Tools - See "Layer Modes" Handout describing layer and tool blending modes

New Retouching Layer


Portrait Retouching Checklist
Type Tool Options

Wednesday, August 1, 2012

Thursday 8/2/12: Layer Masks

My passport photo is one of the most remarkable photographs I have ever seen - no retouching, no shadows, no flattery - just stark me” - unknown

"If you want reality take the bus." - David LaChapelle 

"People say photographs don't lie, mine do." - David LaChapelle
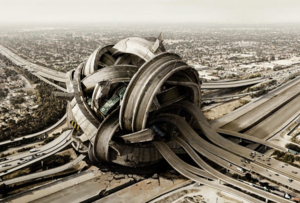
© Erwin Olaf

© Eugenio Recuenco

© Amoeba Digital Imaging ?

© Mark Holthusen

© Randal Ford


Layer Masks
White = Reveals elements of the layer
Black = Masks elements of the layer

Layer Masks - Tips and Tricks:
·       Make a Selection and create a new Adjustment Layer = automatic Layer Mask
·       Paint with White or Black or even Gray on a Layer Mask.  When a layer mask is selected in the Layers Palette, painting in the image window with White Reveals the pixels of the layer the layer mask is linked to, while painting with any opacity of Gray partly shows the layer, and painting with Black Masks the pixels of that layer.  Pixels are never erased, they are just temporarily masked.  You can always reveal them again by painting with white!  Nondestructive and infinitely editable!!!
·       Click the Link Icon between the image layer thumbnail and the Layer Mask thumbnail to move the pixels or layer mask independently from one another
·       Select > Refine Mask - with a Layer Mask selected in the Layers Palette, you can refine the edges of a layer mask (not just a selection!)
·       Command H to Hide your marching ant selection edges temporarily while using Standard Mode in the Refine Mask dialogue box
·       Command-Click any image layer or layer mask to automatically select the pixels on that layer, or the white area of a layer mask.  (Shift+Command-Click to add, or Option+Command-Click multiple image layers or layer masks to add or subtract from a selection.

Replacing Color and Converting to B&W

Wednesday 8/1/12: RGB #s + Quick Masks + Selections

"I do not object to retouching, dodging. or accentuation as long as they do not interfere with the natural qualities of photographic technique." - Alfred Stieglitz

"Sitting over a hot computer ain't my idea of fun. My creativity goes almost completely into picture taking. (But) I suppose if I ever retired, I would enjoy learning the Photoshop craft far more than playing golf." - Herbert Keppler - On going digital. (Popular Photography & Imaging, January 2005)

© Andric

© Andric

© Andric
© Samantha Everton

© Samantha Everton

© Samantha Everton


Understanding the Digital RGB #s

To have an understanding of Photoshop, you must first learn how the program "sees" your image.  The most basic picture element of a digital photograph is a "pixel" and an image is made up of a lot of these.  Photoshop simply manipulates the color, tone, and position of these pixels in order to achieve the photographer's desired results.  But before you start retouching, I want you to understand how the colors and tones of each pixel are interpreted by Photoshop, and ultimately by you as a Photoshop user!

As in photography, it all starts with light and specifically the mixing of 3 primary colors together to achieve all the other colors we can possibly see. 

The Additive Process involves mixing Red, Green, and Blue light together in varying proportions to produce any color.  The RGB color method is used in today's digital camera sensors, television sets, and computer monitors, and was was used in early color film photography.  Adding red, green, and blue light together in equal amounts will produce white light.  Mixing just 2 of the additive primaries together will produce one of the subtractive primaries (see below).


RGB = Additive Primaries (CMY = Subtractive Primaries used in printing along with black or K)

Equal amounts of RGB light mixed together = White light

Most of the color images you will be working on in PS are 8bits/channel.  Your images have 3 total channels -- Red, Green, and Blue, which can be viewed independently in the channels palette and in the info palette. And 8 bits when multiplied by the 3 channels gives you a total of 24bits of information per pixel, or 16.7 million colors.  This is known as the bit depth, or color depth, of your image and describes how many colors each individual pixel can have!

Back to 8bits/channel though, which is to say 256 tones/channel.  This gives you a tonal scale of 0 to 255 for each channel (Red, Green, and Blue).  When all channels are set to 0, and turned off, you have a black pixel.  All channels turned on to 255, results in a white pixel.  And as long as the RGB numbers are equal, you are looking at a neutral gray pixel (darker if the numbers are closer to 0 and lighter if they are closer to 255!).  

The RGB numbers for each pixel in your image can be viewed in the Info Palette, and the information can be used in Levels or Curves to properly balance the color and tone in your image.  In fact, having an understanding of these numbers is one of the most useful things I can teach you in this class.  With this knowledge, you can almost guarantee yourself proper printing results and accurate color with most of your images.

Please take a look at the below handout for more information on RGB numbers:


Editing Selections:

Standard Mode = Once a Selection Tool is used (such as Magic Wand or the Marquee Tool), "marching ants" display your selected area in the image window.  

Add to a selection = Shift key (or choose the "add to selection" button in the Options Bar)
Subtract from a selection = Option key (or choose the "subtract from selection" button in the Options Bar)

Quick Mask Mode = (icon just below Foreground/Background colors in the Tools Palette)  Visual color overlay of your selection - useful to view how soft or hard your selection edges are.  (Switch to Quick Mask Mode by clicking the button at the bottom of the Tools Palette)

Add to a selection = with Brush Tool, paint with White in image window
Subtract from a selection = choose Brush Tool with Black as foreground color


Select > Refine Edges – to refine Selection Edges, or to refine the edges of a Layer Mask!
·       Radius = Increasing will improve the edges in areas of soft transitions (similar to Feather)
·       Contrast = Will make soft edges crisper and remove artifacts along the edges of a selection
·       Smooth = Will smooth out jagged selection edges (Use radius to help restore some of the detail)
·       Feather = Will uniformly soften the edge of the selection and help produce a soft edged mask
·       Contract/Expand = Shrinks or Expands a selection size


Select > Save Selection to save a selection as an Alpha Channel
Select > Load Selection to load an Alpha Channel (simply reselects a saved selection)
Select > Color Range to select similar colors within the entire image


How to properly adjust for color and tone with a Curve Adjustment Layer

Monday, July 30, 2012

Tuesday 7/31/12: Layers + Selections

"As an artist, I work to gain technical skill in order to become more fluid, more expressive and more creative in my craft. Technique is always at the service of creativity." - Evan Chong

"A toast to film? You bet. But don't forget the Photoshop chaser." - Herbert Keppler; Film vs. Photoshop. (Popular Photography & Imaging, March 2006)

© Monte Isom

© Monte Isom

© Monte Isom


File Formats
  • JPEG (.jpg = Joint Photographic Expert Group): Compresses photos into a smaller file size, but degrades photo quality.  Good for email or web and is recognized by almost all software programs.
  • TIFF (.tif = Tagged Image File Format): Larger file size, but good image quality.  Best for printing.  Tiff file can be saved with or without layers and is recognized by many software programs.
  • RAW (.raw/.cr2/.nef/... = Raw) = Most flexible file format for photographers since no data has been processed.  But you must process a file into a workable file format before using...which requires more skill and knowledge.
  • PSD (.psd = Photoshop Document):  Good for layers, but large file size and can only be opened in PS.

Saving Image Files Recap:
  •  For Print = Tiff @ 300dpi
  • For Web or Email = Jpeg @ 72dpi
  • With Layers = PSD @ optimal resolution (usually 300dpi)


Great article explaining the differences in File Formats:
http://www.digitalphotopro.com/business/hi-tech-studio-file-format-decoder-ring.html


Layers

Layers are the backbone of Photoshop.  New elements can be placed on individual layers and each layer can be edited and manipulated without effecting any other layer.  An original image starts off with only a single layer titled background.  You can then add these additional layers:

  • New Blank Layer
  • Text Layer
  • Another Image Layer
  • Adjustment Layer

Wednesday, July 25, 2012

Monday 7/30/12: PS Intro

Welcome NYU Photoshop Intensive!


I'm very much looking forward to sharing my knowledge of Photoshop with you, and I can only hope you are just as excited to utilize and explore PS as a creative tool in the world of photography!

Before getting started, I wanted to point out that I like to begin each class with a quote that relates to that week's discussion material.  I think it's a fun way to introduce the lecture and I hope you enjoy them.  Below is our first quote, surprisingly enough not from a photographer but from Vincent Versace.  I think it sums up my philosophy about Photoshop, and shares with you how I'll approach teaching the course!  You'll also find I usually can't narrow it down to just one quote either...and they're often contradictory...so enjoy and decipher them as you see fit!
 
"Photoshop is not a verb. It is a noun. It is the means to an end, not the end itself." - Vincent Versace

"Photoshop – that which produces a great photograph from an average photographer." - Frank Karycinski


Bridge

Adobe Bridge is an organizational software that comes bundled with Photoshop and the Adobe Creative Suite package.  Think of it as a more robust file browser...like a basic mac window that's been spiced up!  Among other things, Bridge allows you to rename and organize files, assign colored labels or star ratings to images, edit the embedded metadata, and output to a pdf or web gallery.  Image files can also be shown in different sized thumbnails, slide shows or lists - making it more advantageous than a basic mac window for photographers and designers.

Adobe Bridge Interface

Photoshop

Adobe Photoshop is the industry leader in image-editing software.  It allows you to enhance, manipulate, and create imagery with endless possibilities!  


Adobe Photoshop Interface

Photoshop Tools


Pixel = Picture Element 
(Smallest square of color that makes up your image)


Resolution = total # of pixels in your image


Resolution can be defined by:
  • Dimension:  5184 x 3456
  • Overall Pixels: 17,915,904
  • Megapixel Value:  18MP

Output Resolutions
Optimal Output Resolution for PRINT = 300dpi
Optimal Output Resolution for MONITOR = 72ppi


File Formats
  • PSD (.psd = Photoshop Document):  Good for layers, but large file size and can only be opened in PS.
  • JPEG (.jpg = Joint Photographic Expert Group): Compresses photos into a smaller file size, but degrades photo quality.  Good for email or web and is recognized by almost all software programs.
  • TIFF (.tif = Tagged Image File Format): Larger file size, but good image quality.  Best for printing.  Tiff file can be saved with or without layers and is recognized by many software programs.
  • RAW (.raw/.cr2/.nef/... = Raw) = Most flexible file format for photographers since no data has been processed.  But you must process a file into a workable file format before using...which requires more skill and knowledge.

Saving Image Files Recap:
  •  For Print = Tiff @ 300dpi
  • For Web or Email = Jpeg @ 72dpi
  • With Layers = PSD @ optimal resolution (usually 300dpi)


Great article explaining the differences in File Formats:
http://www.digitalphotopro.com/business/hi-tech-studio-file-format-decoder-ring.html